[ad_1]
Textual content-to-image era is a process wherein a machine studying (ML) mannequin generates a picture from a textual description. The aim is to generate a picture that intently matches the outline, capturing the small print and nuances of the textual content. This process is difficult as a result of it requires the mannequin to know the semantics and syntax of the textual content and to generate photorealistic photographs. There are various sensible purposes of text-to-image era in AI pictures, idea artwork, constructing structure, trend, video video games, graphic design, and rather more.
Secure Diffusion is a text-to-image mannequin that empowers you to create high-quality photographs inside seconds. When real-time interplay with the sort of mannequin is the aim, guaranteeing a easy consumer expertise is determined by using accelerated {hardware} for inference, akin to GPUs or AWS Inferentia2, Amazon’s personal ML inference accelerator. The steep prices concerned in utilizing GPUs usually requires optimizing the utilization of the underlying compute, much more so when you’ll want to deploy totally different architectures or customized (fine-tuned) fashions. Amazon SageMaker multi-model endpoints (MMEs) provide help to deal with this downside by serving to you scale 1000’s of fashions into one endpoint. By utilizing a shared serving container, you may host a number of fashions in an economical, scalable method inside the identical endpoint, and even the identical GPU.
On this publish, you’ll study Secure Diffusion mannequin architectures, various kinds of Secure Diffusion fashions, and strategies to reinforce picture high quality. We additionally present you learn how to deploy Secure Diffusion fashions cost-effectively utilizing SageMaker MMEs and NVIDIA Triton Inference Server.
 |
 |
 |
| Immediate: portrait of a cute bernese canine, artwork by elke Vogelsang, 8k extremely real looking, trending on artstation, 4 ok | Immediate: structure design of front room, 8 ok ultra-realistic, 4 ok, hyperrealistic, centered, excessive particulars | Immediate: New York skyline at evening, 8k, lengthy shot pictures, unreal engine 5, cinematic, masterpiece |
Secure Diffusion structure
Secure Diffusion is a text-to-image open-source mannequin that you should use to create photographs of various types and content material just by offering a textual content immediate. Within the context of text-to-image era, a diffusion mannequin is a generative mannequin that you should use to generate high-quality photographs from textual descriptions. Diffusion fashions are a sort of generative mannequin that may seize the complicated dependencies between the enter and output modalities textual content and pictures.
The next diagram reveals a high-level structure of a Secure Diffusion mannequin.
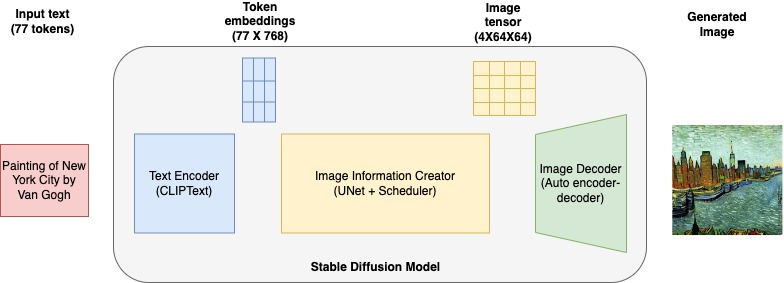
It consists of the next key parts:
- Textual content encoder – CLIP is a transformers-based textual content encoder mannequin that takes enter immediate textual content and converts it into token embeddings that symbolize every phrase within the textual content. CLIP is skilled on a dataset of photographs and their captions, a mix of picture encoder and textual content encoder.
- U-Web – A U-Web mannequin takes token embeddings from CLIP together with an array of noisy inputs and produces a denoised output. This occurs although a sequence of iterative steps, the place every step processes an enter latent tensor and produces a brand new latent area tensor that higher represents the enter textual content.
- Auto encoder-decoder – This mannequin creates the ultimate photographs. It takes the ultimate denoised latent output from the U-Web mannequin and converts it into photographs that represents the textual content enter.
Forms of Secure Diffusion fashions
On this publish, we discover the next pre-trained Secure Diffusion fashions by Stability AI from the Hugging Face mannequin hub.
stable-diffusion-2-1-base
Use this mannequin to generate photographs based mostly on a textual content immediate. This can be a base model of the mannequin that was skilled on LAION-5B. The mannequin was skilled on a subset of the large-scale dataset LAION-5B, and primarily with English captions. We use StableDiffusionPipeline from the diffusers library to generate photographs from textual content prompts. This mannequin can create photographs of dimension 512 x 512. It makes use of the next parameters:
- immediate – A immediate is usually a textual content phrase, phrase, sentences, or paragraphs.
- negative_prompt – You can too move a unfavorable immediate to exclude specified parts from the picture era course of and to reinforce the standard of the generated photographs.
- guidance_scale – The next steerage scale leads to a picture extra intently associated to the immediate, on the expense of picture high quality. If specified, it should be a float.
stable-diffusion-2-depth
This mannequin is used to generate new photographs from present ones whereas preserving the form and depth of the objects within the authentic picture. This stable-diffusion-2-depth mannequin is fine-tuned from stable-diffusion-2-base, an additional enter channel to course of the (relative) depth prediction. We use StableDiffusionDepth2ImgPipeline from the diffusers library to load the pipeline and generate depth photographs. The next are the extra parameters particular to the depth mannequin:
- picture – The preliminary picture to situation the era of recent photographs.
- num_inference_steps (elective) – The variety of denoising steps. Extra denoising steps normally results in a higher-quality picture on the expense of slower inference. This parameter is modulated by
energy. - energy (elective) – Conceptually, this means how a lot to remodel the reference picture. The worth should be between 0–1.
pictureis used as a place to begin, including extra noise to it the bigger the energy. The variety of denoising steps is determined by the quantity of noise initially added. Whenenergyis 1, the added noise can be most and the denoising course of will run for the total variety of iterations laid out innum_inference_steps. A worth of 1, due to this fact, basically ignorespicture. For extra particulars, check with the next code.
stable-diffusion-2-inpainting
You should utilize this mannequin for AI picture restoration use instances. You can too use it to create novel designs and pictures from the prompts and extra arguments. This mannequin can also be derived from the bottom mannequin and has a masks era technique. It specifies the masks of the unique picture to symbolize segments to be modified and segments to go away unchanged. We use StableDiffusionUpscalePipeline from the diffusers library to use inpaint modifications on authentic picture. The next further parameter is particular to the depth mannequin:
- mask_input – A picture the place the blacked-out portion stays unchanged throughout picture era and the white portion is changed
stable-diffusion-x4-upscaler
This mannequin can also be derived from the bottom mannequin, moreover skilled on the 10M subset of LAION containing 2048 x 2048 photographs. Because the identify implies, it may be used to upscale lower-resolution photographs to increased resolutions
Use case overview
For this publish, we deploy an AI picture service with a number of capabilities, together with producing novel photographs from textual content, altering the types of present photographs, eradicating undesirable objects from photographs, and upscaling low-resolution photographs to increased resolutions. Utilizing a number of variations of Secure Diffusion fashions, you may deal with all of those use instances inside a single SageMaker endpoint. Which means you’ll must host massive variety of fashions in a performant, scalable, and cost-efficient approach. On this publish, we present learn how to deploy a number of Secure Diffusion fashions cost-effectively utilizing SageMaker MMEs and NVIDIA Triton Inference Server. You’ll be taught concerning the implementation particulars, optimization strategies, and greatest practices to work with text-to-image fashions.
The next desk summarizes the Secure Diffusion fashions that we deploy to a SageMaker MME.
| Mannequin Identify | Mannequin Dimension in GB |
stabilityai/stable-diffusion-2-1-base |
2.5 |
stabilityai/stable-diffusion-2-depth |
2.7 |
stabilityai/stable-diffusion-2-inpainting |
2.5 |
stabilityai/stable-diffusion-x4-upscaler |
7 |
Answer overview
The next steps are concerned in deploying Secure Diffusion fashions to SageMaker MMEs:
- Use the Hugging Face hub to obtain the Secure Diffusion fashions to an area listing. It will obtain
scheduler, text_encoder, tokenizer, unet, and vaefor every Secure Diffusion mannequin into its corresponding native listing. We use therevision="fp16"model of the mannequin. - Arrange the NVIDIA Triton mannequin repository, mannequin configurations, and mannequin serving logic
mannequin.py. Triton makes use of these artifacts to serve predictions. - Bundle the conda atmosphere with further dependencies and the package deal mannequin repository to be deployed to the SageMaker MME.
- Bundle the mannequin artifacts in an NVIDIA Triton-specific format and add
mannequin.tar.gzto Amazon Easy Storage Service (Amazon S3). The mannequin can be used for producing photographs. - Configure a SageMaker mannequin, endpoint configuration, and deploy the SageMaker MME.
- Run inference and ship prompts to the SageMaker endpoint to generate photographs utilizing the Secure Diffusion mannequin. We specify the
TargetModelvariable and invoke totally different Secure Diffusion fashions to match the outcomes visually.
We have now printed the code to implement this answer structure within the GitHub repo. Comply with the README directions to get began.
Serve fashions with an NVIDIA Triton Inference Server Python backend
We use a Triton Python backend to deploy the Secure Diffusion pipeline mannequin to a SageMaker MME. The Python backend enables you to serve fashions written in Python by Triton Inference Server. To make use of the Python backend, you’ll want to create a Python file mannequin.py that has the next construction: Each Python backend can implement 4 foremost capabilities within the TritonPythonModel class:
Each Python backend can implement 4 foremost capabilities within the TritonPythonModel class: auto_complete_config, initialize, execute, and finalize.
initialize is named when the mannequin is being loaded. Implementing initialize is elective. initialize lets you do any needed initializations earlier than operating inference. Within the initialize perform, we create a pipeline and cargo the pipelines utilizing from_pretrained checkpoints. We configure schedulers from the pipeline scheduler config pipe.scheduler.config. Lastly, we specify xformers optimizations to allow the xformer reminiscence environment friendly parameter enable_xformers_memory_efficient_attention. We offer extra particulars on xformers later on this publish. You’ll be able to check with mannequin.py of every mannequin to know the totally different pipeline particulars. This file may be discovered within the mannequin repository.
The execute perform is named each time an inference request is made. Each Python mannequin should implement the execute perform. Within the execute perform, you might be given a listing of InferenceRequest objects. We move the enter textual content immediate to the pipeline to get a picture from the mannequin. Pictures are decoded and the generated picture is returned from this perform name.
We get the enter tensor from the identify outlined within the mannequin configuration config.pbtxt file. From the inference request, we get immediate, negative_prompt, and gen_args, and decode them. We move all of the arguments to the mannequin pipeline object. Encode the picture to return the generated picture predictions. You’ll be able to check with the config.pbtxt file of every mannequin to know the totally different pipeline particulars. This file may be discovered within the mannequin repository. Lastly, we wrap the generated picture in InferenceResponse and return the response.
Implementing finalize is elective. This perform lets you do any cleanups needed earlier than the mannequin is unloaded from Triton Inference Server.
When working with the Python backend, it’s the consumer’s accountability to make sure that the inputs are processed in a batched method and that responses are despatched again accordingly. To attain this, we advocate following these steps:
- Loop by way of all requests within the
requestsobject to type abatched_input. - Run inference on the
batched_input. - Cut up the outcomes into a number of
InferenceResponseobjects and concatenate them because the responses.
Seek advice from the Triton Python backend documentation or Host ML fashions on Amazon SageMaker utilizing Triton: Python backend for extra particulars.
NVIDIA Triton mannequin repository and configuration
The mannequin repository accommodates the mannequin serving script, mannequin artifacts and tokenizer artifacts, a packaged conda atmosphere (with dependencies wanted for inference), the Triton config file, and the Python script used for inference. The latter is necessary once you use the Python backend, and it’s best to use the Python file mannequin.py. Let’s discover the configuration file of the inpaint Secure Diffusion mannequin and perceive the totally different choices specified:
The next desk explains the assorted parameters and values:
| Key | Particulars |
identify |
It’s not required to incorporate the mannequin configuration identify property. Within the occasion that the configuration doesn’t specify the mannequin’s identify, it’s presumed to be similar to the identify of the mannequin repository listing the place the mannequin is saved. Nevertheless, if a reputation is offered, it should match the identify of the mannequin repository listing the place the mannequin is saved. sd_inpaint is the config property identify. |
backend |
This specifies the Triton framework to serve mannequin predictions. This can be a necessary parameter. We specify python, as a result of we’ll be utilizing the Triton Python backend to host the Secure Diffusion fashions. |
max_batch_size |
This means the utmost batch dimension that the mannequin helps for the sorts of batching that may be exploited by Triton. |
enter→ immediate |
Textual content immediate of sort string. Specify -1 to simply accept dynamic tensor form. |
enter→ negative_prompt |
Damaging textual content immediate of sort string. Specify -1 to simply accept dynamic tensor form. |
enter→ mask_image |
Base64 encoded masks picture of sort string. Specify -1 to simply accept dynamic tensor form. |
enter→ picture |
Base64 encoded picture of sort string. Specify -1 to simply accept dynamic tensor form. |
enter→ gen_args |
JSON encoded further arguments of sort string. Specify -1 to simply accept dynamic tensor form. |
output→ generated_image |
Generated picture of sort string. Specify -1 to simply accept dynamic tensor form. |
instance_group |
You should utilize this this setting to position a number of run cases of a mannequin on each GPU or on solely sure GPUs. We specify KIND_GPU to make copies of the mannequin on accessible GPUs. |
parameters |
We set the conda atmosphere path to EXECUTION_ENV_PATH. |
For particulars concerning the mannequin repository and configurations of different Secure Diffusion fashions, check with the code within the GitHub repo. Every listing accommodates artifacts for the precise Secure Diffusion fashions.
Bundle a conda atmosphere and lengthen the SageMaker Triton container
SageMaker NVIDIA Triton container photographs don’t comprise libraries like transformer, speed up, and diffusers to deploy and serve Secure Diffusion fashions. Nevertheless, Triton lets you convey further dependencies utilizing conda-pack. Let’s begin by creating the conda atmosphere with the required dependencies outlined within the atmosphere.yml file and create a tar mannequin artifact sd_env.tar.gz file containing the conda atmosphere with dependencies put in in it. Run the next YML file to create a conda-pack artifact and replica the artifact to the native listing from the place it is going to be uploaded to Amazon S3. Word that we’ll be importing the conda artifacts as one of many fashions within the MME and invoking this mannequin to arrange the conda atmosphere within the SageMaker internet hosting ML occasion.
Add mannequin artifacts to Amazon S3
SageMaker expects the .tar.gz file containing every Triton mannequin repository to be hosted on the multi-model endpoint. Due to this fact, we create a tar artifact with content material from the Triton mannequin repository. We will use this S3 bucket to host 1000’s of mannequin artifacts, and the SageMaker MME will use fashions from this location to dynamically load and serve numerous fashions. We retailer all of the Secure Diffusion fashions on this Amazon S3 location.
Deploy the SageMaker MME
On this part, we stroll by way of the steps to deploy the SageMaker MME by defining container specification, SageMaker mannequin and endpoint configurations.
Outline the serving container
Within the container definition, outline the ModelDataUrl to specify the S3 listing that accommodates all of the fashions that the SageMaker MME will use to load and serve predictions. Set Mode to MultiModel to point that SageMaker will create the endpoint with the MME container specs. We set the container with a picture that helps deploying MMEs with GPU. See Supported algorithms, frameworks, and cases for extra particulars.
We see all three mannequin artifacts within the following Amazon S3 ModelDataUrl location:
Create an MME object
We use the SageMaker Boto3 consumer to create the mannequin utilizing the create_model API. We move the container definition to the create mannequin API together with ModelName and ExecutionRoleArn:
Outline configurations for the MME
Create an MME configuration utilizing the create_endpoint_config Boto3 API. Specify an accelerated GPU computing occasion in InstanceType (we use the identical occasion sort that we’re utilizing to host our SageMaker pocket book). We advocate configuring your endpoints with at the very least two cases with real-life use instances. This enables SageMaker to supply a extremely accessible set of predictions throughout a number of Availability Zones for the fashions.
Create an MME
Use the previous endpoint configuration to create a brand new SageMaker endpoint and anticipate the deployment to complete:
The standing will change to InService when the deployment is profitable.
Generate photographs utilizing totally different variations of Secure Diffusion fashions
Let’s begin by invoking the bottom mannequin with a immediate and getting the generated picture. We move the inputs to the bottom mannequin with immediate, negative_prompt, and gen_args as a dictionary. We set the info sort and form of every enter merchandise within the dictionary and move it as enter to the mannequin.
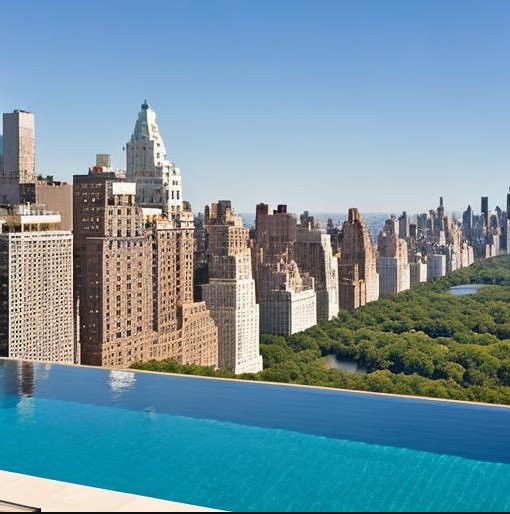
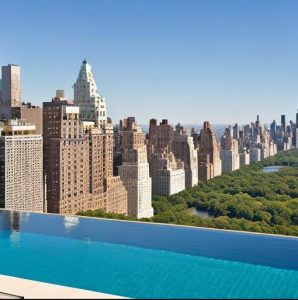
Immediate: Infinity pool on prime of a excessive rise overlooking Central Park
Working with this picture, we are able to modify it with the versatile Secure Diffusion depth mannequin. For instance, we are able to change the fashion of the picture to an oil portray, or change the setting from Central Park to Yellowstone Nationwide Park just by passing the unique picture together with a immediate describing the modifications we wish to see.
We invoke the depth mannequin by specifying sd_depth.tar.gz within the TargetModel of the invoke_endpoint perform name. Within the outputs, discover how the orientation of the unique picture is preserved, however for one instance, the NYC buildings have been reworked into rock formations of the identical form.
 |
 |
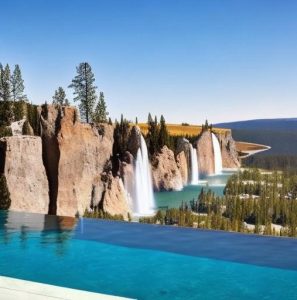 |
| Unique picture | Oil portray | Yellowstone Park |
One other helpful mannequin is Secure Diffusion inpainting, which we are able to use to take away sure components of the picture. Let’s say you wish to take away the tree within the following instance picture. We will achieve this by invoking the inpaint mannequin sd_inpaint.tar.gz. To take away the tree, we have to move a mask_image, which signifies which areas of the picture needs to be retained and which needs to be stuffed in. The black pixel portion of the masks picture signifies the areas that ought to stay unchanged, and the white pixels point out what needs to be changed.
 |
 |
 |
| Unique picture | Masks picture | Inpaint picture |
In our last instance, we downsize the unique picture that was generated earlier from its 512 x 512 decision to 128 x 128. We then invoke the Secure Diffusion upscaler mannequin to upscale the picture again to 512 x 512. We use the identical immediate to upscale the picture as what we used to generate the preliminary picture. Whereas not needed, offering a immediate that describes the picture helps information the upscaling course of and may result in higher outcomes.
 |
 |
| Low-resolution picture | Upscaled picture |
Though the upscaled picture isn’t as detailed as the unique, it’s a marked enchancment over the low-resolution one.
Optimize for reminiscence and pace
The xformers library is a approach to pace up picture era. This optimization is just accessible for NVIDIA GPUs. It hurries up picture era and lowers VRAM utilization. We have now used the xformers library for memory-efficient consideration and pace. When the enable_xformers_memory_efficient_attention possibility is enabled, it’s best to observe decrease GPU reminiscence utilization and a possible speedup at inference time.
Clear Up
Comply with the instruction within the clear up part of the pocket book to delete the useful resource provisioned a part of this weblog to keep away from pointless costs. Refer Amazon SageMaker Pricing for particulars the price of the inference cases.
Conclusion
On this publish, we mentioned Secure Diffusion fashions and how one can deploy totally different variations of Secure Diffusion fashions cost-effectively utilizing SageMaker multi-model endpoints. You should utilize this method to construct a creator picture era and enhancing instrument. Try the code samples within the GitHub repo to get began and tell us concerning the cool generative AI instrument that you simply construct.
In regards to the Authors
 Simon Zamarin is an AI/ML Options Architect whose foremost focus helps prospects extract worth from their information property. In his spare time, Simon enjoys spending time with household, studying sci-fi, and dealing on numerous DIY home initiatives.
 Vikram Elango is a Sr. AI/ML Specialist Options Architect at AWS, based mostly in Virginia, US. He’s at the moment centered on generative AI, LLMs, immediate engineering, massive mannequin inference optimization, and scaling ML throughout enterprises. Vikram helps monetary and insurance coverage trade prospects with design and structure to construct and deploy ML purposes at scale. In his spare time, he enjoys touring, mountain climbing, cooking, and tenting together with his household.
 João Moura is an AI/ML Specialist Options Architect at AWS, based mostly in Spain. He helps prospects with deep studying mannequin coaching and inference optimization, and extra broadly constructing large-scale ML platforms on AWS. He’s additionally an lively proponent of ML-specialized {hardware} and low-code ML options.
 Saurabh Trikande is a Senior Product Supervisor for Amazon SageMaker Inference. He’s obsessed with working with prospects and is motivated by the aim of democratizing machine studying. He focuses on core challenges associated to deploying complicated ML purposes, multi-tenant ML fashions, value optimizations, and making deployment of deep studying fashions extra accessible. In his spare time, Saurabh enjoys mountain climbing, studying about revolutionary applied sciences, following TechCrunch, and spending time together with his household.
[ad_2]