[ad_1]
Within the earlier two tutorials, you’ve arrange our weblog software, and it’s already working on the native server. On this tutorial, we wish to take issues additional by including a remark system that permits readers so as to add feedback after studying an article.
- The first half explains our weblog software, a mannequin to retailer some posts, and an admin interface to carry out CRUD operations.
- The second half noticed us add views, URLs to map the views, and templates to show the weblog posts.
It is best to try these initiatives first to get all the pieces from this tutorial.
Creating the Remark Mannequin
To arrange a remark system, we’d like a separate database desk to avoid wasting and retrieve feedback. Open the fashions.py file and add the next to create the Remark mannequin.
class Remark(fashions.Mannequin):
    identify = fashions.CharField(max_length=80)
    put up = fashions.ForeignKey(Publish, on_delete=fashions.CASCADE, related_name="feedback")
    electronic mail = fashions.EmailField()
    physique = fashions.TextField()
    created_on = fashions.DateTimeField(auto_now_add=True)
    energetic = fashions.BooleanField(default=False)

    class Meta:
        ordering = ['-created_on']

    def __str__(self):
        return f'Remark {self.content material} by {self.identify}'
That is just like the earlier fashions we created. We now have a reputation subject for customers so as to add their names. The put up subject has a ForeignKey relation. This establishes a many-to-one relationship in order that many feedback could be made on one put up.
The put up subject has three arguments together with the put up mannequin within the relationship. The on_delete argument is about to fashions.CASCADE so that when a put up is deleted, the feedback may even be deleted. The final one, the related_name argument, is used to retrieve the put up of a given remark.
We outline an energetic Boolean subject set to False. The creator of the put up will wish to determine when to show it to True as soon as a remark is permitted to forestall spam.
Let’s now run migrations to make these modifications within the database.
python3 handle.py makemigrations
python3 handle.py migrate
Including feedback to the admin
The code beneath ought to go to the admin.py file. You should definitely import the Remark mannequin.
class CommentAdmin(admin.ModelAdmin):
    list_display = ('identify', 'physique', 'put up', 'created_on', 'energetic')
    list_filter = ('energetic', 'created_on')
    search_fields = ('identify', 'electronic mail', 'physique')
    actions = ['approve_comments']

    def approve_comments(self, request, queryset):
        queryset.replace(energetic=True)

admin.web site.register(Remark, CommentAdmin)
The primary three strains contained in the CommentAdmin class needs to be acquainted because it’s just like what we did earlier to customise the admin interface within the first half sequence of this mission tutorial. Nonetheless, since we wish to stop spam by setting the motion subject within the Remark class to False, we additionally wish to outline when to set it to True.
We did this within the approve_comments() methodology which updates the energetic subject to True. As you possibly can see, it’s already added to the actions methodology. With this, we are able to simply approve many feedback directly. If this isn’t clearly understood, you’ll perceive it quickly after we open the admin interface.
Create a superuser or log in to open the admin interface.
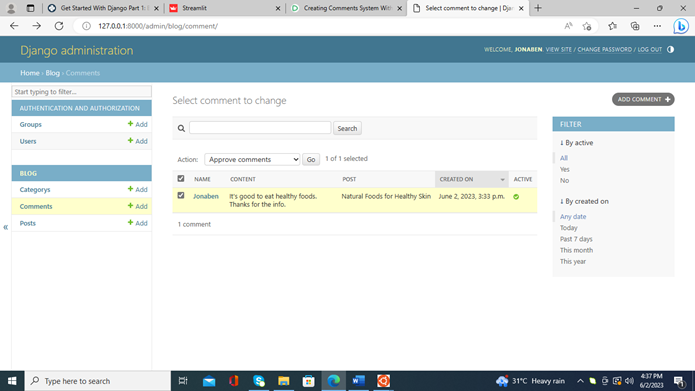
Did you see the ‘Approve feedback’ within the Motion part? As soon as you choose all feedback and click on Go, it’s going to approve all of the feedback. This function is strictly what we outline within the admin.py file.
Hoping that it’s understood, we proceed to the following step.
Making a Type
Within the earlier part, we added feedback to the admin. The primary motive for doing so is to manually approve all feedback. Nonetheless, the creator doesn’t must edit or create feedback.
In that case, we have now to create a kind for readers to create and edit feedback. With out doing this, we can not get suggestions from guests as they don’t have entry to the admin.
By conference, all varieties are created in a varieties.py file contained in the app folder. Ours is not going to be an exception. So, hoping you’ve already carried out so, write the next:
from .fashions import Remark
from django import varieties


class CommentForm(varieties.ModelForm):
    class Meta:
        mannequin = Remark
        fields = ('identify', 'electronic mail', 'physique')
Making a kind is made simple with Django as all the pieces is completed in only a few strains of code. Django’s inbuilt kind has already carried out the heavy lifting with its wealthy and safe API. All we have now to do is to create a category that inherits the category. Then, we outline the fields we wish to be displayed. So simple as that.
Discover that we use the ModelForm class as a result of we wish the shape enter to be saved within the database mannequin.
Creating Views
Within the second a part of this mission tutorial, we created class-based views. We’ll make a giant adjustment to the weblog element view to incorporate kind processing utilizing function-based views.
from .varieties import CommentForm
from .fashions import Publish
from django.shortcuts import render, get_object_or_404

def blog_detail(request, slug):
    put up = get_object_or_404(Publish, slug=slug)
    feedback = put up.feedback.filter(energetic=True)
    new_comments = None
    if request.methodology == 'POST':
        comment_form = CommentForm(knowledge=request.POST)
        if comment_form.is_valid():

            new_comment = comment_form.save(commit=False)

            new_comment.put up = put up
                 new_comment.save()
    else:
        comment_form = CommentForm()
    context = {
        'put up': put up,
        'feedback': feedback,
        'new_comments': new_comments,
        'comment_form': comment_form
    }
    return render(request, 'blog_detail.html', context)
We use the get_object_0r_404() operate to get the Publish mannequin. The put up variable comprises the present put up. if not discovered, it raises an Http404 exception. As soon as discovered, it retrieves solely permitted feedback. The phrase ‘feedback’ in put up.feedback is the associated identify we assigned to the put up subject whereas making a relationship with the Publish mannequin.
For brand spanking new feedback, we name within the CommentForm class. It passes in remark particulars for validation. As soon as validated, we assign it to the new_comment variable that was initially set to None, however with out saving it (commit=False) till we hyperlink it to the put up object which is the present put up. Afterward, we save the shape into the database.
If the request methodology is GET, an empty kind will likely be handed to the template. Ultimately, no matter outcomes from executing the view operate, whether or not the request methodology is POST or GET, is included within the context dictionary and handed to the template.
If this appears obscure, take your time to learn the above explanations once more.
Creating Templates
Alter the blog_detail.html file to seem like this:
{% extends 'base.html' %}
{% block content material %}
<div class="container">
<div class="row">
<div class="col-md-8 card mb-4 mt-3 left prime">
<div class="card-body">
<h1>{% block title %} {{ put up.title }} {% endblock title %}</h1>
<p class=" text-muted">{{ put up.creator }} | {{ put up.created_on }}</p>
{% for class in put up.classes.all %}
<p class="text-muted">{{ class.identify }}</p>
{% endfor %}
<p class="card-text ">{ secure }</p>
</div>
</div>
{% block sidebar %} {% embrace 'sidebar.html' %} {% endblock sidebar %}
</div>
</div>
<div class="col-md-8 card mb-4 mt-3 ">
<div class="card-body">
<!-- feedback -->
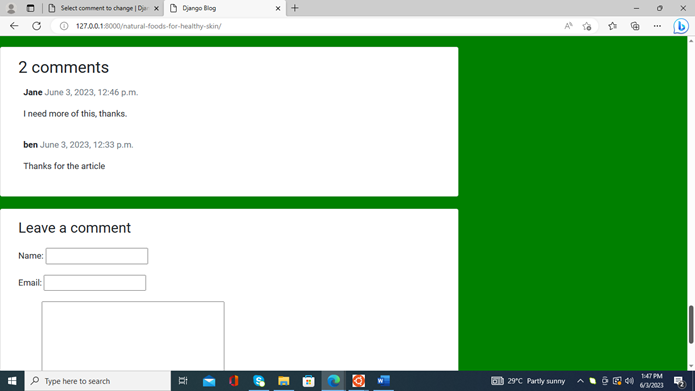
<h2>{{ feedback.depend }} feedback</h2>
{% for remark in feedback %}
<div class="feedback" model="padding: 10px;">
<p class="font-weight-bold">
{{ remark.identify }}
<span class=" text-muted font-weight-normal">
{{ remark.created_on }}
</span>
</p>
{ linebreaks }
</div>
{% endfor %}
</div>
</div>
<div class="col-md-8 card mb-4 mt-3 ">
<div class="card-body">
{% if new_comment %}
<div class="alert alert-success" position="alert">
Your remark will seem as soon as permitted
</div>
{% else %}
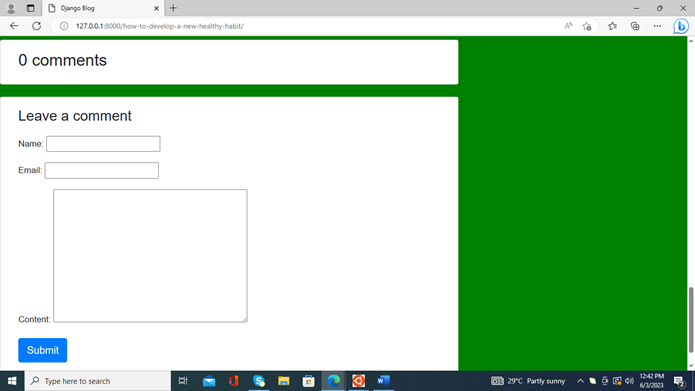
<h3>Go away a remark</h3>
<kind methodology="put up" model="margin-top: 1.3em;">
{{ comment_form.as_p }}
{% csrf_token %}
<button sort="submit" class="btn btn-primary btn-lg">Submit</button>
</kind>
{% endif %}
</div>
</div>
</div>
</div>
{% endblock content material %}
We use Django templating engine to dynamically loop by means of all of the feedback and show them. If new feedback are added, we show a message, ‘Your remark will seem as soon as permitted.’ As soon as the feedback are permitted by the admin, they are going to be displayed.
In any other case, we show the shape for customers to remark. Keep in mind, the comment_form holds the shape object. Through the use of comment_form.as_p, we wish the shape to be rendered throughout the paragraph tags. As common, the csrf_token serves as a safety to the shape from cross-site scripting assaults.
The URLs
Replace the URL with the next:
path('<slug:slug>/', blog_detail, identify="blog_detail")
Testing the Type
Begin the native server to check the shape.
Enter feedback by filling out the shape. Then go to the admin interface to approve the feedback.
Styling the Type
We are able to make the shape look higher through the use of django-crispy-form. Set up it utilizing pip.
pip set up django-crispy-forms
After set up, add it to the INSTALLED_APPS part of the settings.py file.
INSTALLED_APPS = [
    ...
    # third-party app
    'crispy_forms',
]
Discover within the base.html file that we’re utilizing Bootstrap. Therefore, we have now to point that within the settings.py file.
CRISPY_TEMPLATE_PACK = 'bootstrap4'
In that case, we even have to put in crispy-bootstrap4 and add it to the INSTALLED_APPS.
INSTALLED_APPS = [
    ...
    # third-party apps
    'crispy_forms',
    'crispy_bootstrap4',
]
Let’s now regulate the blog_detail markup file to make use of the crispy kind. On prime of the file, load the crispy tag.
{% load crispy_forms_tags %}
...
<kind methodology="put up" model="margin-top: 1.3em;">
          { crispy }
          {% csrf_token %}
          <button sort="submit" class="btn btn-primary  btn-lg">Submit</button>
 </kind>
We make a one-line change eradicating comment_form.as_p and changing it with Django crispy kind tag.
Begin the server to see the change.
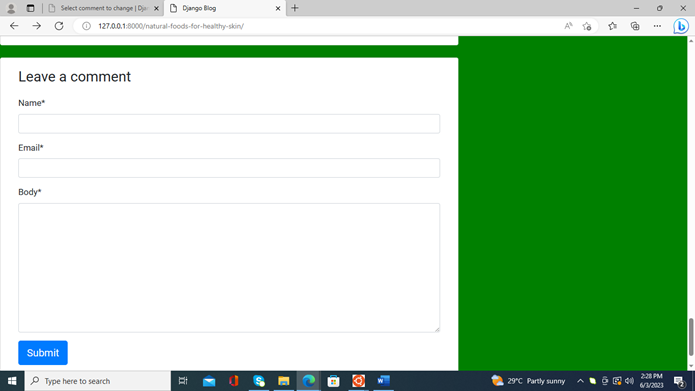
Because of django-crispy-forms, the shape now appears extra mature.
Conclusion
On this tutorial, we created a remark system for readers to present suggestions on a given put up learn.
This entails making a database mannequin, customizing the admin interface, making a kind for feedback; adjusting the view operate, the URLs, and the template.
Little doubt, it was an fascinating mission tutorial. The supply code on my GitHub web page has been up to date to replicate these modifications.
Are we able to deploy the app to a reside server? Not but. The weblog content material is so congested and never formatted. No footage are displayed. I additionally wish to embrace different issues I discussed within the earlier sequence. We nonetheless have loads to do.
Nonetheless, we’re making good progress. Within the subsequent sequence of this mission, we’ll begin with formatting our weblog content material. Keep tuned!
? Really helpful: How I Created a Sketch-and-Cartoon-Making App Utilizing Flask


Jonathan Okah is knowledgeable freelance Python developer whose major purpose is to resolve a perceived drawback with the usage of expertise, thus making life simple for you.
He has primary data of Python, C, JavaScript, HTML, CSS and R, however has taken his data of Python to the following degree at Upwork, the place he performs companies for shoppers.
Jonathan has a aptitude for writing and has written a number of weblog articles for shoppers. He’s always studying to enhance his abilities. At present, he’s finding out software program engineering, hoping to turn out to be a full-stack internet developer.
In his leisure time, Jonathan enjoys taking part in video games and watching the English Premier League. You possibly can contact him in your freelance initiatives at Upwork.
[ad_2]