[ad_1]
What are Figma constraints?
Figma is a robust design software for creating internet and cell interfaces, and Figma constraints are a vital function of this software program. Constraints permit designers to manage the place and measurement of any layer, throughout a number of display screen sizes, relative to its father or mother body.
Constraints could be significantly useful when creating responsive layouts as a result of they can help you dictate how a layer ought to behave on the x- and y-axes when its father or mother body is resized. This lets you decide how a component ought to scale or resize in response to modifications in display screen measurement.
Moreover, constraints could be utilized to particular person layers inside a body or teams of frames (generally known as nested constraints), which simplifies the creation of advanced layouts to reply appropriately throughout totally different units and display screen sizes.
On this publish, we’ll discover the various kinds of constraints, discover ways to use them, and see some ideas and superior methods for working higher with constraints.
Varieties of constraints in Figma
There are two sorts of constraints in Figma — horizontal and vertical — that management the x- and y-axis, respectively:
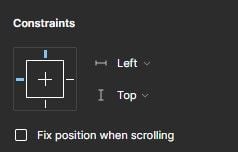
The properties of the horizontal constraint embody the next:
- Left: This property pins the left fringe of a layer to the left fringe of its father or mother body. No matter modifications to the father or mother body’s width, the layer’s place on the x-axis will stay constant in relation to the left fringe of the father or mother body
- Proper: This property pins the correct fringe of a layer to the correct fringe of its father or mother body. No matter modifications to the father or mother body’s width, the layer’s place on the x-axis will stay constant in relation to the correct fringe of the father or mother body
- Left and proper: This property pins a layer’s left and proper edges to the left and proper edges of its father or mother body. No matter modifications to the father or mother body’s width, the layer’s place on the x-axis will stay constant in relation to the left and proper edges of the father or mother body
- Heart: This property pins the middle level of a layer to the middle level of its father or mother body. No matter modifications to the father or mother body’s width, the layer’s place on the x-axis will stay centered relative to the father or mother body
- Scale: This property means that you can scale a layer horizontally because the father or mother body’s width modifications. That is helpful once you wish to preserve the side ratio of a picture or icon, for instance
The properties of the vertical constraint embody:
- Prime: This constraint property pins the highest fringe of a layer to the highest fringe of its father or mother body. Because the father or mother body’s peak modifications, the layer’s place on the y-axis will stay the identical relative to the highest fringe of the father or mother body
- Backside: This constraint property pins the underside fringe of a layer to the underside fringe of its father or mother body. Because the father or mother body’s peak modifications, the layer’s place on the y-axis will stay the identical relative to the underside fringe of the father or mother body
- Prime and backside: This constraint property pins a layer’s prime and backside edges to the highest and backside edges of its father or mother body. Because the father or mother body’s peak modifications, the layer will stretch or shrink vertically to keep up its distance from the highest and backside edges of the father or mother body
- Heart: This constraint property pins the middle level of a layer to the middle level of its father or mother body. Because the father or mother body’s peak modifications, the layer’s place on the y-axis will stay centered relative to the father or mother body
- Scale: This constraint property means that you can scale a layer vertically because the father or mother body’s peak modifications. That is helpful once you wish to preserve the side ratio of a picture or icon, for instance
Making use of constraints to Figma layouts
If you create a body in a Figma file and add a layer contained in the body, Figma will give the constraint a default format: Left on the x-axis and Prime on the y-axis. You possibly can observe this by clicking on the layer and observing the dashed blue strains surrounding it:
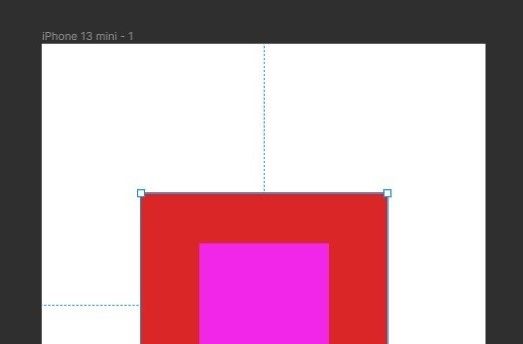
It’s also possible to select to create nested constraints — a body inside one other body — to create extra advanced layouts. To create a nested constraint, hit the F key to pick the body software and create two frames, with the second inside the primary:
You’ll discover that the constraints of the internal body (in pink) are utilized relative to its father or mother body (in pink).
Making a responsive format utilizing constraints in Figma
Now, we’ll transfer on to a sensible instance and see learn how to create a responsive format by making use of constraints to UI parts. I’ve ready a Figma file that you would be able to duplicate and observe together with. Ultimately, you’ll have created the format beneath:

Belongings within the Figma file

Our design file above consists of the next UI parts:
- A navigation menu
- A hero part
- A floating motion button
- A UI factor that makes use of a grid format — right here, you’ll discover ways to use constraints successfully with grids
The file additionally incorporates a desktop body with a preset grid format so that you can place the above parts. As a result of the Sort of format grid right here isn’t Stretch, any factor positioned inside the body can have its constraints set relative to the desktop body and never the grid columns — extra on this momentarily.
Now let’s begin designing!
Pull the navigation menu into the desktop body and align it to the left edge. For those who attempt stretching the menu from the correct, you’ll discover that the Login button doesn’t behave how we would like it to — keep on with the correct facet of the menu:

To repair this, choose the Login button and set the horizontal constraint to Proper. This could now pin it to the correct facet of the menu.

However the menu isn’t absolutely responsive but. For those who stretch the menu to the top of the body, then choose the desktop body and resize it, you will note that the with of the menu doesn’t sync with its father or mother body.
You possibly can resolve this by deciding on the menu and setting its horizontal constraint to Left and Proper. Now the menu will resize with the width of the desktop:

Constraining the Hero part
Carry the hero part into the desktop body and align it alongside the vertical middle of the body. We count on this part to at all times stays on the middle of the body even when the body is decreased — however, unsurprisingly, this doesn’t occur.
To realize this, set the horizontal constraint of the hero part to Heart and depart the vertical constraint at Prime.
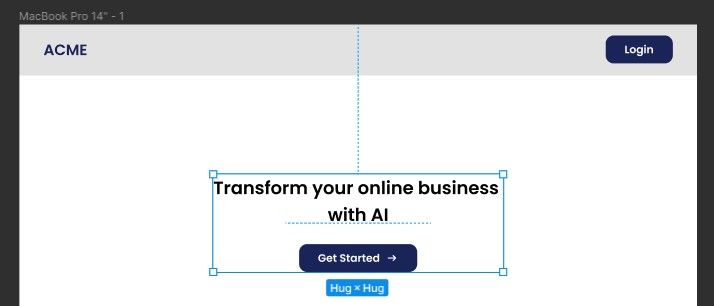
Now the hero part will at all times keep on the middle once you resize the father or mother body.
Constraining the Floating motion button
This kind of button is commonly positioned on the backside proper of the display screen. Pull the button into the desktop body and place it on the backside proper of the display screen. Now set the horizontal constraint to Proper and the vertical constraint to Backside, like so:
These constraints will hold the button pinned to the underside proper nook because the father or mother body is resized.
Understanding the influence of format grids on constraints
The final part of our format incorporates UI parts for an onboarding course of. The onboarding activity factor makes use of a format grid to manage the constraints of its baby parts. Earlier than we proceed, let’s intently study how format grids have an effect on constraints in Figma.
The Sort of format grid utilized to a body in your design will immediately have an effect on the constraint habits of parts inside that body.
For instance, for those who create a format grid and set its Sort to Stretch, the constraints of the weather inside that grid shall be decided primarily based on the bounds of the column or row by which the factor is positioned:
Whereas, utilizing any of the opposite sorts (Left, Proper, Heart) will set the constraints of parts inside the body to be relative to the bounds of the body itself.
Now let’s proceed. Import the part’s label and the format grid factor (onboarding activity) into the desktop body, then align them to its second column:

Tip: Use
Cmd + ;(Mac) orCtrl + Shift + 4(Home windows) to toggle the visibility of all grids in your artboard
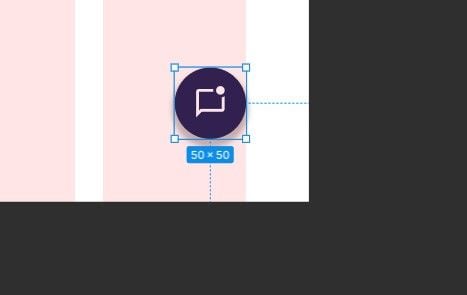
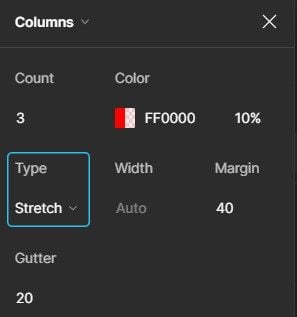
The onboarding activity factor has a format grid utilized to it that consists of three columns. Apply a grid to any Figma factor by clicking the + icon subsequent to the Structure Grid choice in the correct panel. For this factor, we’ll set the Sort property to Stretch.
This can trigger the icon’s constraints to be relative to the boundaries of the final column:
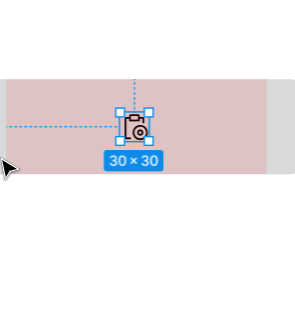
You’ll discover that on stretching this factor, the icon doesn’t keep centered in its column. You possibly can resolve this by setting each the horizontal and vertical constraints of the icon to Heart. This can make sure the icon stays centered throughout totally different sizes:
![]()
Now, one very last thing: stretch this factor to the top of the penultimate column of the desktop body, then, set the horizontal constraint of this factor to Left and Proper in order that it turns into conscious of the scale of the father or mother body.
And now it’s best to have a totally responsive format made utilizing solely Figma constraints!

Conclusion
Figma constraints are a robust software for designers to create constant layouts that reply to modifications in container measurement, and be certain that the format stays constant and visually interesting.
As a developer, I liken this function to CSS positioning the place the absolute and relative choices in CSS permit for exact management over factor positioning inside an online format. The father or mother factor has a relative place, whereas the kid factor has an absolute place and makes use of the highest, backside, left, and proper choices to place itself in relation to the father or mother factor.
LogRocket: Analytics that offer you UX insights with out the necessity for interviews

LogRocket allows you to replay customers’ product experiences to visualise wrestle, see points affecting adoption, and mix qualitative and quantitative information so you’ll be able to create wonderful digital experiences.
See how design decisions, interactions, and points have an effect on your customers — attempt LogRocket right this moment.
[ad_2]